Lightning Bolts

You’re flying your ship down a cavern, dodging and weaving through enemy fire.  It’s becoming rapidly apparent, however, that you’re outmatched.  So, desperate to survive, you flip The Switch.  Yes, that switch.  The one that you reserve for those…special occasions.  Your ship charges up and releases bolt after deadly bolt of lightning into your opponents, devastating the entire enemy fleet.

At least, that’s the plan.

But how do you, the game developer, RENDER such an effect?

Lightning Is Fractally Right

As it turns out, generating lightning between two endpoints can be a deceptively simple thing to generate.  It can be generated as an L-System (with some randomization per generation).  Some simple pseudo-code follows: (note that this code, and really everything in this article, is geared towards generating 2D bolts; in general, that’s all you should need…in 3D, simply generate a bolt such that it’s offset relative to the camera’s view plane.  Or you can do the offsets in the full three dimensions, it’s your choice)

segmentList.Add(new Segment(startPoint, endPoint));
offsetAmount = maximumOffset; // the maximum amount to offset a lightning vertex.
for each generation (some number of generations)
  for each segment that was in segmentList when this generation started
    segmentList.Remove(segment); // This segment is no longer necessary.

    midPoint = Average(startpoint, endPoint);
    // Offset the midpoint by a random amount along the normal.
    midPoint += Perpendicular(Normalize(endPoint-startPoint))*RandomFloat(-offsetAmount,offsetAmount);

    // Create two new segments that span from the start point to the end point,
    // but with the new (randomly-offset) midpoint.
    segmentList.Add(new Segment(startPoint, midPoint));
    segmentList.Add(new Segment(midPoint, endPoint));
  end for
  offsetAmount /= 2; // Each subsequent generation offsets at max half as much as the generation before.
end for

Essentially, on each generation, subdivide each line segment into two, and offset the new point a little bit.  Each generation has half of the offset that the previous had.

So, for 5 generations, you would get:

lightningstage2lightningstage3lightningstage4lightningstage5lightningstage6

That’s not bad.  Already, it looks at least kinda like lightning.  It has about the right shape.  However, lightning frequently has branches: offshoots that go off in other directions.

To do this, occasionally when you split a bolt segment, instead of just adding two segments (one for each side of the split), you actually add three.  The third segment just continues in roughly the first segment’s direction (with some randomization thrown in)

direction = midPoint - startPoint;
splitEnd = Rotate(direction, randomSmallAngle)*lengthScale + midPoint; // lengthScale is, for best results, < 1.  0.7 is a good value.
segmentList.Add(new Segment(midPoint, splitEnd));

Then, in subsequent generations, this, too, will get divided.  It’s also a good idea to make these splits dimmer.  Only the main lightning bolt should look fully-bright, as it’s the only one that actually connects to the target.

Using the same divisions as above (and using every other division), it looks like this:

lightningsplitstage2lightningsplitstage4lightningsplitstage6Now that looks a little more like lightning!  Well..at least the shape of it.  But what about the rest?

Adding Some Glow

Initially, the system designed for Procyon used rounded beams.  Each segment of the lightning bolt was rendered using three quads, each with a glow texture applied (to make it look like a rounded-off line).  The rounded edges overlapped, creating joints.  This looked pretty good:

lightningtest

..but as you can see, it tended to get quite bright.  It only got brighter, too, as the bolt got smaller (and the overlaps got closer together).  Trying to draw it dimmer presented additional problems: the overlaps became suddenly VERY noticeable, as little dots along the length of the bolt.  Obviously, this just wouldn’t do.  If you have the luxury of rendering the lightning to an offscreen buffer, you can render the bolts using max blending (D3DBLENDOP_MAX) to the offscreen buffer, then just blend that onto the main scene to avoid this problem.  If you don’t have this luxury, you can create a vertex strip out of the lightning bolt by creating two vertices for each generated lighting point, and moving each of them along the 2D vertex normals (normals are perpendicular to the average of the directions two line segments that meet at the current vertex).

That is, you get something like this:

lightningvertices

Animation

This is the fun part.  How do you animate such a beast?

As with many things in computer graphics, it requires a lot of tweaking.  What I found to be useful is as follows:

Each bolt is actually TWO bolts at a time.  In this case every 1/3rd of a second, one of the bolts expires, but each bolt’s cycle is 1/6th of a second off.  That is, at 60 frames per second:

  • Frame 0: Bolt1 generated at full brightness
  • Frame 10: Bolt1 is now at half brightness, Bolt2 is generated at full brightness
  • Frame 20: A new Bolt1 is generated at full, Bolt2 is now at half brightness
  • Frame 30: A new Bolt2 is generated at full, Bolt1 is now at half brightness
  • Frame 40: A new Bolt1 is generated at full, Bolt2 is now at half brightness
  • Etc…

Basically, they alternate.  Of course, just having static bolts fading out doesn’t work very well, so every frame it can be useful to jitter each point just a tiny bit (it looks fairly cool to jitter the split endpoints even more than that, it makes the whole thing look more dynamic).  This gives:

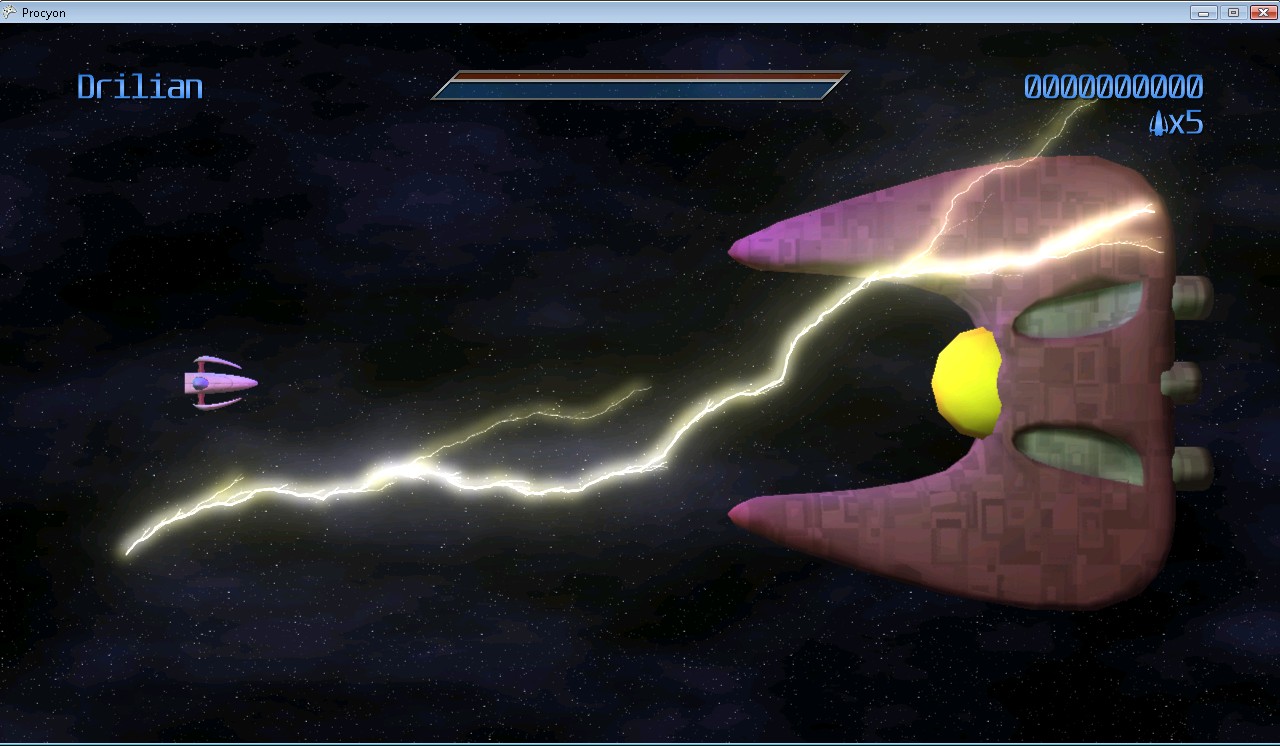
And, of course, you can move the endpoints around…say, if you happen to have your lightning targetting some moving enemies:

So that’s it!  Lightning isn’t terribly difficult to render, and it can look super-cool when it’s all complete.

43 thoughts on “Lightning Bolts”

  1. Well done. I’m most impressed and will be trying something like this soon. Generating the path of the lightning was something I’d been puzzling for some time, and I think your method is both elegant and impressive looking. Strong work.

  2. Hey hey Drillian, great stuff here, really nice finished effect too!

    I’m trying to do up a bit of a lightning effect in flash, and I’m using your work here as a base. Obviously performance is our main issue in actionscript, but I have something more fundamental I was hoping you could clarify for me.

    When you’re moving endpoints around, how are you moving all your segment points in between? You don’t seem to be regenerating the bolt each time you move the end point, so I assume you’re generating all the segments once and then transforming all the points to follow their target (the end point)? Do you have a quick description of how you handle scaling all the points together?

  3. It’s actually pretty simple – I generate all of the offsets in one pass, then use them to generate the geometry strips given the current start/end points after that. Effectively, the jittered lightning offsets remain the same for a bolt (though I do jiggle them just slightly, not enough to change the shape of the bolt in any substantial measure, just enough so that it’s visible that it’s not static), but the end points (and, thus, the midpoints) are recalculated every frame.

  4. Ah I see, you create a single *offset* array of distance and up/downishness and then use that to draw the segments fresh every frame. Nice thinking!

  5. Hi Drilian. This is a fantastic article. Very well explained.

    I’m a pretty experienced programmer, and have been toying around in XNA for fun. I wanted to try to replicate this for my own edu-ma-cation.

    I feel pretty confident in creating all the segments for a bolt, thanks to your pseudocode. I feel confident in rendering this to a separate render target, and then copy that back to the back buffer. The only thing I’m not sure about is how to actually draw each specific Segment.

    “Each segment of the lightning bolt was rendered using three quads, each with a glow texture applied (to make it look like a rounded-off line).”

    Can you describe your “glow texture”? Is it a small rectangle with some kind of alpha falloff on either side, and that rectangle gets rotated and stretched to match the line of the bolt? And perhaps little circle “end caps” on the end of the rectangle?

    Thanks again for taking the time to write this up. Your results look really fantastic!

    Adman

  6. Another question: What did you change between your Lightning Test 2 video and your Lightning Test 3 video? It looks like there was a huge leap for the better…

    I’ve got basic lightning up and running, just using lines to draw the segments. Pretty sweet. Still toying with some of the variables though.

    Thanks again…

  7. In the case of the glow texture, it was, at the time,just a gradient based on distance from the center (so it looked like a circle). The trick was, the segments were rendered as triples of quads. The middle quad was the line (which stretched the center of the texture out). That is, from left to right, the U coordinates on the vertices went 0, 0.5, 0.5, 1…repeating the middle is what makes it a beam. The outer two quads exist to display the rest of the texture to make it appear rounded. The texture coordinates were basically:

    (0, 0)……..(0.5, 0)……..(0.5, 0)……..(1, 0)

    (0, 1)……..(0.5, 1)……..(0.5, 1)……..(1, 1)

    As to what changes I made between Test 2 and Test 3, there were a few things:

    I changed from rendering each segment of lightning as its own separate rounded-off segment (as explained above) to rendering an entire bolt as a single strip (still using a similar method for rounding the edges). The problem with rendering the rounded segments was that the endpoints overlapped, causing it to render brighter in the center. If it was dimmer than the super-bright that you see in test 2, you could actually see little circles where the overlaps were, which broke the illusion.

    I added some code to jitter the generated points a little bit. In Test 2, you’ll notice that, once a bolt is on-screen, it’s completely static until it fades out and a new one takes its place. In Test 3 (and on), I jitter the points around just a little bit, to make it look a little more dynamic.

    I also recalculate the splits off of the main bolt more frequently, which makes them jitter around even more, though I do think I eventually pulled that change back out.

    Finally, never underestimate the visual power of changing colors!

    I think that’s a good list of everything that I changed. Hope that helps!

  8. Thanks for your response!

    Stretching only the middle of the texture. Got it. I guessed this since posting this morning.

    “I changed from rendering each segment of lightning as its own separate rounded-off segment (as explained above) to rendering an entire bolt as a single strip (still using a similar method for rounding the edges).”

    So if I understand correctly, you render segments one at a time to an offscreen buffer using the stretched texture. But because you use the MAX blend function, you don’t get the bright joints. And then you render the off-screen buffer to the back buffer in one shot. Is that more or less right?

    Adman

  9. I don’t actually do it that way, but it’d be a perfectly valid way to do so, so long as you batch the segments together (you want to draw as many segments as possible with each draw*primitive call, see the XNA batching code for some inspiration).

    I render each bolt as a single triangle strip (one strip per each “branch” of the bolt), though I do it with a dynamic vertex buffer so the whole system of bolts gets rendered in a single draw call.

  10. Well, that’s honestly cool, Drillian!

    Incidentally, I started to write a lightning simulation in March (and didn’t know of your work back then). I used the physically-based approach, dielectric breakdown (because I wanted to have the arcs avoid friends and target foes etc.) and thought I could optimize it to real-time. Boy was I wrong. After getting the naive version faster by x200 with considerable data structure-fu, SSE4 and multi-threading, I was still x3 away from real-time. So, now I use L-systems, too! 🙂

  11. Could you please elucidate exactly what each function in your pseudocode does please? Its a bit annoying as none of those are “standard” functions.

  12. Sure! I figured the names of the functions would give away what they do, but maybe not 🙂

    Average(a, b) – average the two points.
    Perpendicular(v) – Return the 2D vector perpendicular to this one (-v.y, v.x)
    RandomFloat(min, max) – generate a random floating point value between min and max, inclusively.

  13. Very nice. Though it is fractal, it seems less an L-system and more similar to the midpoint displacement technique for terrain generation (just constrained to a line instead of a quad).

  14. Great article! And just what I was looking for.
    Didn’t even started programming my game yet but I knew lightning could be an obstacle. Not anymore! Thanks : )
    Btw, Life force is my favourite NES game. If you make something better, let me know : )

  15. Hey all!

    Very good article I understand what is behind it but i have my problems to implement it.
    Can someone help me to realize this in C#/XNA ? I don’t understand how to do the drawing with the animation (bolt1/bolt2 changes)?
    Would appreciate a code snippet.

    Greetz and Thx to all. 🙂

  16. Hey Drilian, awesome article great work. Have been looking for something like this for ages!

    I was wondering if you could please help me with something.

    Im rendering each segment as three quads, two caps, and a middle. All the vert coordinates are generated into a single vertex buffer so the entire bolt can be drawn as a single batch. However, I have the problem you described above where the end caps of the segments overlap and blend together to create small circles along the bolt. Im using an additive blending when rendering the bolt.

    I dont quite understand your solution to this. Could you explain a little more please? Also, what blending do you use when rendering your bolt?

    Thanks!

  17. Gotta say, this was an awesome explanation, I used it with a few tweaks to implement this on an android game I’m working on. The phones I’m working on seem to be unable to generate them in real-time after a certain amount of branching (too much detail)

    Heres an image from my game with the lightning:
    http://imgur.com/lOHiF

    1. Looks nice! Yeah, I had some difficulty getting them to generate in realtime on the Xbox with a lot of branches, so I can imagine it’d be even harder to do on the phone.

  18. Looks awesome!

    Im trying to make this effect work on Windows phone7 XNA. Would the same technique work on wp7? Could you share some small code snippet for it aswell?

    Ty, trev

    1. While I don’t have any code of it working on WP7, it seems like it would work fine.

      You could do it by rendering the segments with spritebatch. Alternately, you could create a DynamicVertexBuffer and making lightning strips; some creative texturing/alpha blending and BasicEffect should be enough to get it looking nice.

  19. Hi, thanks a bunch for this algorithm. However there is one thing I did not fully understand:
    Could you please explain how you achieved the jittering? Maybe some pseudo-code…

  20. I noticed that 2 people already asked you about the jittering. Could you please explain how you accomplish such an effect?

    1. About the jittering:

      I don’t have my code in front of me, but I seem to remember that, at each lightning point, I’ve stored the position generated, plus the normal of the bolt at that point (that is, the vector the point was moved along when generating that segment, “direction”) as well as the scale of that particular generation (that is, “offsetAmount” above).

      Then, for each frame of display, I just generate a small random number (something like 1/20th to 1/10th of lengthScale, maybe smaller) and use that value to offset the point along the direction. That is, each frame, each point moves into a slightly different place, always relative to the originally-generated position, so they don’t wander.

      Does that make sense? I hope it does, but I’m pretty tired so if it doesn’t I’ll try to clarify.

      EDIT: had said “lengthScale” instead of “offsetAmount” above.

  21. This is amazing! I’m working with Unity and graphics programming isn’t exactly my focus, but I think I can apply the concept, which you’ve conveyed VERY well, to either the existing Particle System, or to just create a mesh dynamically based on this.

    Also, your music is absolutely EPIC!

  22. I think I understand your explanation. However, I think that the scale of the generation you mention is NOT “lengthScale” but the result of RandomFloat(-offsetAmount,offsetAmount) when the point was generated. Am I right? Or are you really refering to the variable “lengthScale” (which does not make sense to me cause it’s only used when generating split segments)?

  23. I actually meant “offsetAmount” instead of “lengthScale” – my mistake. I’ve amended my previous comment. Sorry about that!

Leave a Reply

Your email address will not be published. Required fields are marked *